Wednesday, February 27, 2013

Infuse Learning Review

An interesting learner response system compatible with any device. http://www.infuselearning.com/ 

A quick easy to set up virtual classroom. 
In the virtual classroom you can ask a questions out loud and allow students to answer using just about any internet capable device. 
Or you can create a quiz before hand and assign it to students as the come in. 
You can download the responses to an Excel sheet.


Answers can be in the form of:
  • freehand drawing
  • true/false
  • multiple choice
  • sort and order
  • short answer
  • numbers
  • Likert Scale (1-5)
With the prepared quiz you can watch student progress and see correct and incorrect responses. 

If you use this in the classroom I'd love to hear some feedback on how it works for an entire class. 

EDIT
I just opened my sample excel sheet and it actually is very nice.

Friday, February 15, 2013

Mayhemism

November is national novel writing month. http://www.nanowrimo.org/ Participants are challenged to write 50,000 words in one month. (For the math adverse that is 1666.67 words per day)

One group decided to take a different approach. they decided to write the entire novel in one day. So they opened a Google Doc and invited anyone to help with the writing. This is what they wrote. Title: Digi Daze

This may not be your cup of tea, but there is more. I was in a webinar with one of the organizers of this novel and we wrote a crowdsourced poem in half an hour. We wrote Mayhemism 

This might be possible in a regular classroom. However, as with most things some ground rules actually help the process. As Jesse Stommel says,
"A potential pitfall of this sort of work is a variation of the bystander effect, whereby participants will see a problem or gap in the document but assume someone else will fix it. The more collaborators involved, the more the effect is amplified. One solution is to delegate ownership of different parts of the process to each participant. While smaller scale collaborations (of 2 or 3) are simpler logistically, they still present certain challenges."

To see a 30 minute poem being written try the YouTube video (yes it is sped up)

Friday, February 8, 2013

Structured Support

The structured support people in our district are really pretty helpful. I noticed a lot of the kids (well not a lot but a few around the building) have this huge rubberband on their desk.

I'd never seen it before but it sure looks like a great way to keep an ansy kid focused when s/he needs to be. 


Then yesterday our Occupational Therapist sent out a list of 20 stations she has set up around the school. Some in classrooms, in the halls, in the cafeteria, just all over the place so students can find a workstation close by, wherever they are in the building. But the best part is the instructions:
These stations are for little jobs or breaks intended for our little friends that need a purposeful movement break.

Please use your best knowledge as to if the child should be chaperoned or are responsible enough to be independent at the school station(s) or exercises. Also, keep in mind if a child/job is in another classroom or special, to be respectful and considerate of the teacher/class if they are busy with something else please come back at another time and/or choose another station. 
I think it is the most awesome thing in the world for a teacher to have the option of saying, "I think you (and I) need a bit of a break. Why don't you go erase scuff marks on the floor." Or "Why don't you do the activity at station 1."

Lot's of educators say it is difficult on the students and teachers to be cooped up for 6.5 hours a day and make all that time productive. But this is a person who is doing something about it.

 Below are some of my favorite activities.

  • Move chairs Place chairs on top of or remove chairs off of the table.
  • Erase scuff marks on floors   Stick with tennis ball on end, erase black marks on floor.
  • Deliver mail or boxes to classroom Carry milk crate or delivery to office or another room  
  • Stack paper   Take packaged Xerox paper packs and remove or stack in/out of boxes under table.  
  • Sharpen pencils   Sharpen pencils with electric sharpen (please feel free to bring a class cup with pencils in to be sharpened) 
  • Tear paper   Tear paper in small pieces from recycle bin
  • Straighten paper  Make sure colored paper is in neat piles on shelves. 
  • Ride bike up and down hallway Ride bike up and down hallways with weight on back for resistance.
  • Window stickers   Window clings in motor room- Hang window clings on upstairs window by parking lot.  


Enhanced by Zemanta

Friday, February 1, 2013

Evaluation

It seems to me that teacher evaluation is becoming a bigger and bigger topic of concern. I think perhaps most people are starting to realize that no matter how big or expensive, or well crafted a test might be, it is still just a test. Some people will do well even when they guess and some people will freeze up and do worse than they should.

The obvious solution of course is to work together with master teachers and constructively critique each other until everyone is an outstanding teacher. If we had money, time, and patience for such an endeavor we would be doing it.

Some companies suggest schools should implement a video evaluation system. I don't think a video is any substitute for an actual live person in the room and therefore shouldn't be used for evaluative purposes. I like the idea of working with colleagues in a constructive manner to improve teaching practices.

There are many methods that don't involve direct observation - LASW - PLC - Lesson Study - COP - Reflective writing, blogging, twitter, etc....But I think this video stuff could be one of the many tools teachers can use to improve their own practice. We just don't need to pay for it.


Enhanced by Zemanta

Monday, January 28, 2013

Grabbing an image from the web

While watching some training videos on SMART boards today I realized an essential skill before attempting to create a lesson on the smartboard would be to ability to capture and use media.This of course is a great model for the common core standards

Just as media and technology are integrated in school and life in the twenty-first century, skills related to media use (both critical analysis and production of media) are integrated throughout the standards.

Thus a primer on the use of screen capture and basic annotation tools. Though perhaps the annotation software is less necessary for the SMARTboard. (note I do not talk about copyright use, but the images I use are Creative Common copyright 1.0 from Gerd Altman)

When getting a picture from my computer to use in a presentation I usually want to do a few things.
  1. I only want to capture a part of the screen
  2. I want to use an arrow or something to point to a particular part of the image
  3. I want to add a bit of text
  4. I want to outline an area on the screen
  5. I want to mask a student name or similar

My favorite is Skitch from Evernote.

This cool tool can be used on most any platform. (Windows, Mac, iOs, and Android) The exception being Linux computers, but there are many fine alternatives there and if you are using Linux you don’t need me to point you to them.

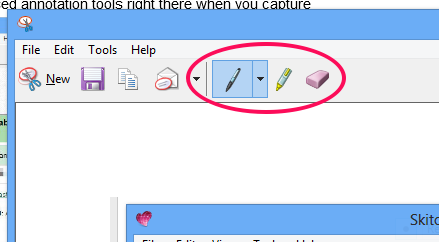
Skitch has the most often used annotation tools right there when you capture 


The little drag me tab at the bottom means I can drag and drop it into word or a power point and it resizes for the program. I don’t have to save the image and then find it and all that other stuff. However, it doesn't work as well with Google docs. It is also easy enough to take a full screen capture and crop it down to size. 

Windows Snip

Before I started using Skitch I used Snip. This program has the advantage of be included in Windows 7.

Snip can quickly snip a small area of the screen and allows you to highlight or write with a pen, but does not have the shape tools or arrows or similar. It is easy enough to copy and paste the image into a document, but it will usually require a resize.


Of course the original screen shot is still on all keyboards. The button print screen will take a full screen still of everything, including a second monitor if you have one and save it on the temporary clipboard. If you then paste the image into an editing program such as Paint in Windows you can edit the picture as needed. You can even paste the image into Word and resize and crop  and add arrows and everything else. 


For Macs the same process can be done using the keyboard shortcuts Command Shift 4. The image is automatically saved onto the desktop and must be pasted into a program to do any annotations. 

Monday, January 14, 2013

How to use twitter

This topic has come up a few times recently and then today I found this great primer for getting started. Most of it is self explanatory, but if you need additional help and you work in the district please feel free to ask. (If you don't work in the district I can't promise I can find time to help)


Friday, November 2, 2012

Digital Storytelling

Pictures are everywhere, they evoke emotion, memories, inspire ideas, and quickly tell a story, and that is what this post is about, telling stories. Digital stories.

Do you remember when families used to invite the neighbors over to watch vacation videos. We would all sit in hard backed chairs, perhaps with a bit of popcorn. Dad would turn down the lights and flip on the movie projector. That bright light would burn the dust and the reels would turn and suddenly your face, happy and smiling, or crying, or laughing, would fill the screen in full color, noise and motion.

Well maybe you don’t remember those days. I don’t either to tell the truth, but the image is still there. We’ve come a long way from that day. The day when film and pictures were taken only during special occasions, only when you wanted to remember this day forever. It made sense then, cameras and film were expensive. Then you had to develop the film. Finally, to show it off meant pulling out picture album, or setting up special equipment.

Boy has the world changed, we have camera phones, instagram, youtube, vimeo and more. the world is awash in digital pictures, vacation videos, even wedding dances. Finding and taking pictures is easy and normal. And as in my dad’s wildest dreams, we can quickly and easily edit those pictures and videos, http://www.gimp.org/, http://www.sumopaint.com/start/, http://picasa.google.com/, http://pixlr.com/, http://www.aviary.com/ http://www.creazaeducation.com, moviemaker, iMovie. And importantly we can add our own audio track to the pictures with http://audioboo.fm/, http://www.podomatic.com/login, http://www.recordmp3.org/, http://soundcloud.com/, http://audacity.sourceforge.net/, Finally, we can leave the real world completely and go with animation http://goanimate.com/, http://www.blender.org/education-help/quickstart, http://www.xtranormal.com/, http://www.voki.com/. Finished projects can be anything from http://www.zooburst.com/, to power point, Prezis, slidshares, google presentations, GoogleLitTrips, Voki, xtranormal, movies, songs, or even live action plays.

All of these programs are free or cheap enough that anyone can use them. They make it so easy that kids younger than 5 can easily take pictures and film video. Then, with a bit of help they can use those images to create their own stories.


So the next time you ask a student to write a story, or a report, think digital. Give them the option of creating a digital story, making a presentation, or just adding some zing to the paper they would normally hand it.

That is the end of the story for most readers. For those who want a more in depth look check out the resources below and continue reading.

http://jonorech.wikispaces.com/
http://www.storycenter.org/
http://50ways.wikispaces.com/
http://www.scribd.com/doc/79101242/10-Digital-Storytelling-Projects

A digital story can be a story of course, but it can also be a summary, a presentation, a synthesis, or even a remix. Whatever it is digital stories are an integral part of the common core standards “research and media skills and understandings are embedded throughout the Standards rather than treated in a separate section.”

Why is media literacy so integral to the common core? Simply, because at its core a good digital story is a good story. It may be easy to add flashy graphics and funny sound bites a digital story, but the end result should still be evaluated on substance.

Why are digital stories encouraged? To start it can be very easy to use digital stories (movie clips) to illustrate important elements of a good story. As students learn to add good story elements to their digital stories they will become more familiar with what makes a quality story.

How can digital stories help writing? Think about the last time you listened to a 5 year old tell a story. It takes about 20 minutes because they feel the need to add every single detail, no matter how extraneous. In creative writing the first rule taught is usually show don’t tell. What better way to getting students to show than to require them to find an image that says what they want. A good presentation strives to make it’s point known with as few words as possible.

When creating a digital story it is important to spend a lot of time creating and mapping out the story. Use your favorite story primer and really let your students take some time to think about and flesh out what their story is going to be. In my own work I like to use storyboarding, or mind maps.

When the story is brainstormed then students can decide which format to showcase it best. Will the final product be a book, a presentation, a movie, what? Different formats require different methods of telling the story. Don’t be afraid to have a class discussion, especially the first time, about how the medium can influence the story. I like to tell the story of the Nixon v Kennedy debate. How the radio listeners thought Nixon won, but TV viewers (the majority of people) gave the nod to Kennedy.

Teach students how to find copyright free media and again give them time to search and play around until they have what they need. Make sure they get more media than they think they will need. You can ask them to get two or three pictures for each page or whatever, it is important to collect more than what is necessary.

As students put their story together they should have too much. Emphasize the need to cut the waste. If it helps they can make a DVD extra to go along with the finished product. Let students practice the art of editing down. Let them deliberate and choose between two images. It will strengthen the story and meet more standards along the way.

Finally, present the finished projects, just don’t do them all, especially not in one day. These are digital stories, publish them on your classroom website. Publish the stories and let students vote on which ones should be presented. Anonymous votes by students in class, school wide votes, global voting, this is the internet right, let the voting begin, just monitor the comments to keep them positive.

When it is all said and done students have created a permanent (or not) artifact of their learning. They have basically graded their own stories. They have pushed each other to make higher quality work. And you have finished a unit that has taught students, how to write, elements of style, editing, digital media, and peer review.